Saturday, 25 June 2016

Box of Treasures


I love going to the workshops with Ian and Mike. I really enjoy making the items and I am always amazed atthe things that come from Ian's mind! Just have a look at Ian's website, link here, each item has so much thought, love and fairy dust in it's creation.

At one of the workshops earlier in the year we started off with a plain and ugly box from The Works and turned it in to this:


We used leather to cover the box, replaced the hinge and the clasp and added embellishments.


The inside was lined with felt. So simple but very effective.


If you like this box and haven't had a chance to take a look at the Mini-One I made under Ian's patient instruction...

Crafty love until next time,

Katie

Wednesday, 22 June 2016

Art Journal Newbie

On a previous post I have told you about how wonderfully awesome Ian Campbell's Steam Punk creations are. Now it's time to give Mike Deakin's classes a turn!

I am new to the world of Art Journals and if it wasn't for Mike holding a class I probably wouldn't have given it a go. Mike has a fab blog and YouTube channel, with fantastic tutorials. If you have not discovered him before, please go have a look!

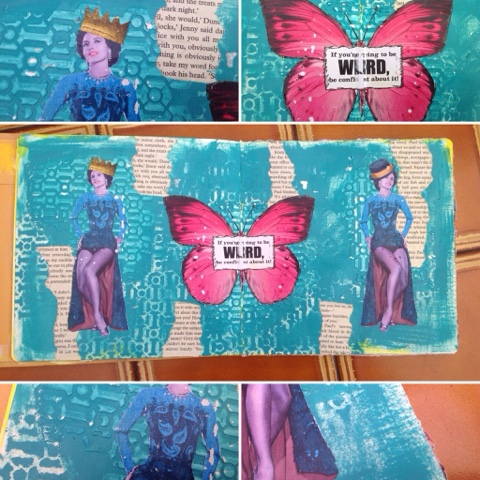
The first class I attended was a technique class, adding texture with paint, stencils and texture paste. We started two pages, one of them I have now completed but the second I have not touched since,I'm just waiting for my inspiration!

We used a credit card to apply the texture paste, dried this and added paint to the topof the page. The paint was sprayed with water and allowed to dribbled and rung through the texture paste highlighting the different shapes.


This is as far I I got with this page so far.I think it's the yellow... I'm just not sure where to take it.

The second page we applied the texture paste through a stencil and applied paint with a baby wipe. Mike is always very generous and supplies us with a sheet of three of his art journal collage sheets that can be found in his Etsy store. We added these to the page along with torn paper - going through the basics of page layout and balance. 


This page is still not finished but I don't thinkit will take long to add the last finishing touches. Look out for a post in the future!

Crafty love until next time,

Katie


Saturday, 18 June 2016

Brusho Birthday Card

As my friends and family know, I am rubbish at making cards and getting them sent off it time. I have all the stuff to make the cards,and I think I have the capabilities of throwing ink on paper to make it look pretty but I never seem to have time! 

I met three very special ladies when I live in Glasgow and I am trying really hard to make sure they each get a handmade card that arrives on time, I think I am succeeding so far! This month it was Linda's turn and here is the card I made for her.


I started by laying a stencil on a sheet of paper and spritzing it with water. Then the fun - sprinkling on the Brushos! I absolutely love Brushos - the colours are so vibrant and I love seeing the different elements that make up each colour - the black is amazing with speaks of greens, blues and yellows.


While this was drying I stamped out 'Linda' with the Clarity alphabet stamps, and cut around the letters. I added a boarder with distress ink.


I thought the shape of the stencil was a bit lost with the Brushos so I laid the stencil back over and drew around it with a light purple colour. It was enough to highlight the stamp but it doesn't stand out a lot. After cutting down the background to size for the card I stuck the sentiment on with foam pads and added a black boarder with a Sharpie.


Finally I layered the topper on blue card. What do you think?


I have entered this card in to the following challenges:

Inspiration Destination
Through the Craft Room Door
Artistic Inspirations
Craft your Passion
613 Avenue Create
Inspirational Challenges
Crafting with Friends
Simply Papercraft for All

I always loveto read your comments so don't forget to say hi!

I hope you are all having a lovely crafty weekend,

Katie